|
Installing Bodywork: An Introduction for Do-It-Yourself Newbies
Updated: Aug 3, 2007
(c) OPP, 2007
Hello and thank you for visiting OPP, your source for aftermarket performance parts and bodywork for Italian and Japanese sportbikes. The purpose of this article is to help educate customers who have never dealt with aftermarket bodywork before. It is important for customers to understand the differences between aftermarket bodywork and the stock bodywork that is available on production sportbikes. We'll discuss how aftermarket bodywork differs from stock bodywork, the modifications that may be required to install aftermarket bodywork and some final thoughts about aftermarket bodywork. By the end of this article, you should have a greater understanding about fairings offered by OPP.
Before we begin, I must stress to those people who have no experience in installing aftermarket bodywork:
IF YOU DON'T KNOW WHAT YOU ARE DOING, TAKE IT TO A PROFESSIONAL!!!
This is not a comprehensive installation guide. It does not have all of the problems nor all of the answers. It is not bike specific. This is an overview to help educate our customers about aftermarket fairings. If you have doubts about the process, it's worth spending the money to have a professional install your bodywork.
Aftermarket Bodywork is Different from Stock
To understand why bodywork differs, you need to understand who buys aftermarket bodywork:
- Street riders building unique custom bikes or show bikes
- Street riders who have crashed their bikes
- Racers who need to make their bikes race-legal (ie. quick access bodywork, enclosed belly pan to catch fluids)
Of these categories, the biggest purchasing group is racers so a lot of aftermarket bodywork that is initially released is race-oriented. Skilled bodywork manufacturers such as MacMoto and Pro-Carbon (suppliers for OPP bodywork) are capable of going beyond the needs of racers by developing replicas of OEM uppers, lowers, tail sections and gas tanks, creating replicas of bodywork used by professional race teams or even improving existing bodywork designs such as our Superbike Airducts.
On a street bike, bodywork is comprised of multiple panels, is designed to carry more than one rider and has provisions to make the bike street-legal such as mirror mounts, turn signals and tail lights. On a race bike, aftermarket fairings are comprised of two-piece front fairings designed for easy engine access and to catch oil that may spill from a cracked case. Tail sections are designed for a single rider and in most cases, the rider sits on seat foam glued to the tail section itself rather than the stock padded seat. Street-legal provisions are eliminated - if you don't use it, lose it. Parts such as mounts for tail lights, turn signals or keylocks may not be found on the inside of aftermarket bodywork for this reason.
Fitting Race Bodywork to a Street Bike
Keeping in mind that most bodywork is race-oriented and adapted for street use, here is a non-comprehensive list of modifications that may be required to fit aftermarket bodywork to a streetbike. We'll work from the front of the bike and make our way to the tail end of the bike.
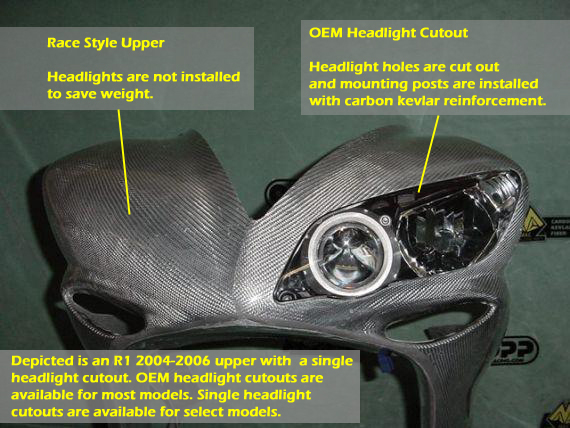
Headlight Cutouts - With the exception of endurance racing, racebikes do not have headlights. To fit an OEM headlight with aftermarket bodywork, you need two things: a hole for the headlight and a way of mounting the headlight onto the bike. At OPP, we have specialists who can cut out OEM headlight holes and install mounting pins to support the headlight. We go in-depth into this process in an article called "OPP Headlight Cutouts: Carbon Kevlar Reinforced for Strength". If you have the option, you should always purchase bodywork adapted to accomodate the OEM headlight rather than do it yourself. It's harder than you think!
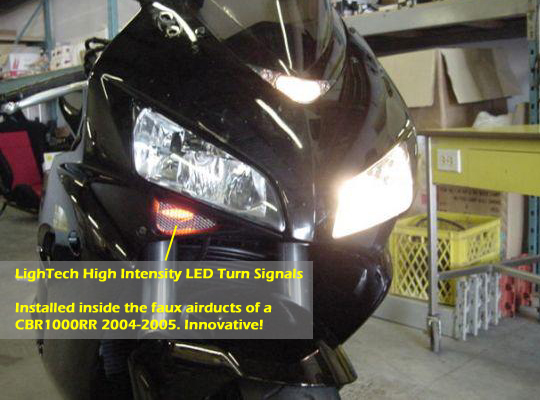
Turn Signals - Holes for turn signals are not present on the side panels so there are two ways of going about installing turn signals. The first option is to cut out holes in the bodywork so allow the OEM turn signal stalks to stick through. In the case of flushmounts that are stock, such as the Kawasaki ZX6R 2005-2006, you can cut the appropriate hole to fit those lights. Otherwise, an popular choice is to install a set of aftermarket turn signals as Gregg's Customs Flushmounts or LighTech's High Intensity LED lights. Aftermarket options are more stylish and do not require the typical hole in the bodywork.
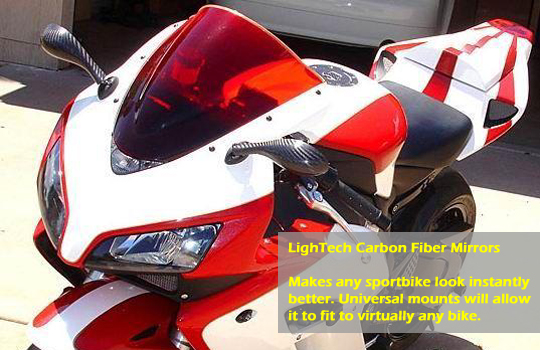
Mirrors - Holes for mounting mirrors may not be found on aftermarket bodywork. However, in most cases, installation is as easy as drilling two small holes where the mounting bolts will go. On most OPP bodywork, these holes are marked on the bodywork so you know that the holes will line up with the fairing stay underneath. While changing bodywork, you should consider picking up some LighTech carbon fiber mirrors which mount to the stock mirror locations.
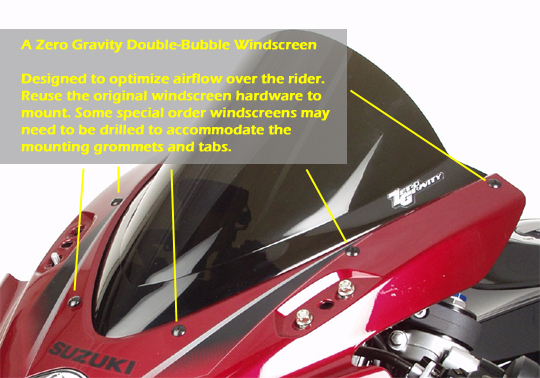
Windscreen - Like mirrors, holes for windscreens may not be predrilled. In most cases, holes are drilled to match the stock windscreen holes and the original mounting hardware is reused. In some cases involving race-replica bodywork (faithful recreations of bodywork used in professional circuits like World Superbike or the AMA), windscreens are not drilled out either so holes need to be drilled in both the bodywork and windscreen. OPP carries windscreens by Puig and Zero Gravity.
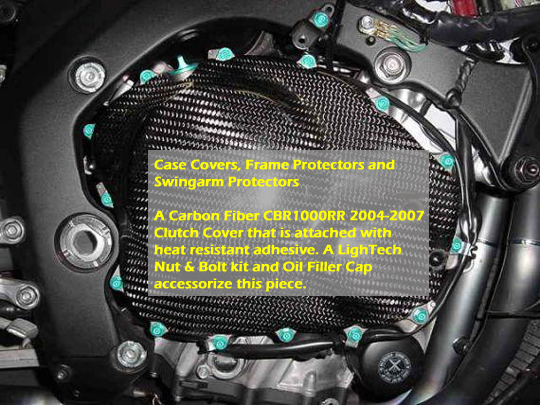
Frame Protectors, Case Covers and Swingarm Protectors - For added crash protection, external case covers and protectors made of carbon fiber, carbon kevlar or titanium silver can be attached to your sportbike. If you accidentally lay the bike down, the case cover or protector will absorb the damage, saving your bike from structural or cosmetic damage. Frame protectors and swingarm protectors can be installed using a strong adhesive such as windshield urethane. For heat sensitive parts such as an engine cover, clutch cover, oil pump cover or crankcase cover, it's important to use a heat resistant adhesive that won't melt and cause the case covers to fall off! We demonstrate the installation process in a How-To called "How to Install Case Covers and Frame Protectors". Double-sided tape is a big no-no. They will tear away as soon as the bike hits the ground.
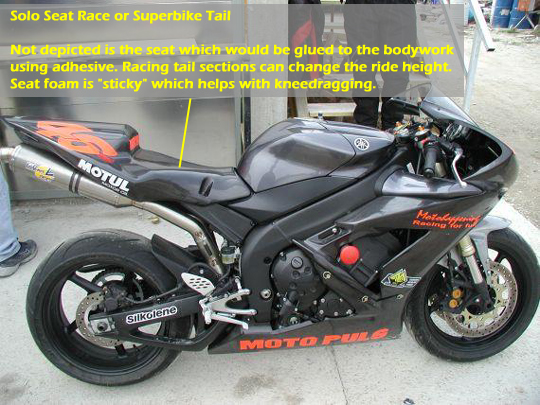
Stock Seats and Seat Foam - Streetbikes are equipped with a padded seat designed for comfort. Racers don't always use this seat. In fact, most professional racers use a race-design tail section that extends all the way up to the gas tank and has seat foam glued on top. This configuration allows changes to the centre of gravity on the bike and allows the rider greater mobility when "hanging off" the bike. It also allows the rider to feel more feedback from the rear suspension. Even though it is designed for racing, it is certainly not limited to the track. Any street rider who wants to add that extra race-replica look should install a Superbike tail section.
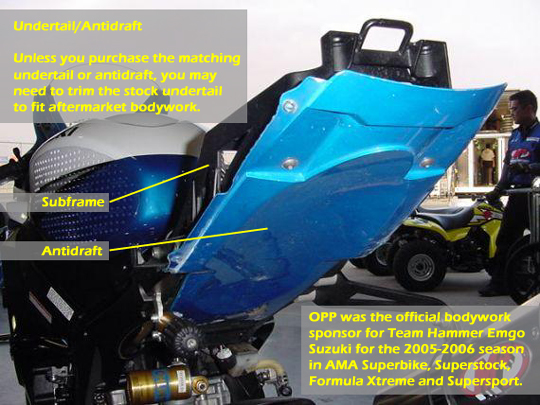
Undertails and Antidrafts - If you look underneath most tail sections, you'll see that there is a separate piece of bodywork covering the bottom of the subframe. It is usually referred to as an undertail or antidraft. The undertail/antidraft works with the tail section to enclose and protect the subframe. A majority of OPP tail sections have a matching undertail/antidraft designed to fit together perfectly with Dzus fasteners. If you install an aftermarket tail section to a bike with a stock undertail/antidraft, you may need to trim the stock undertail/antidraft to fit the tail section over the subframe.
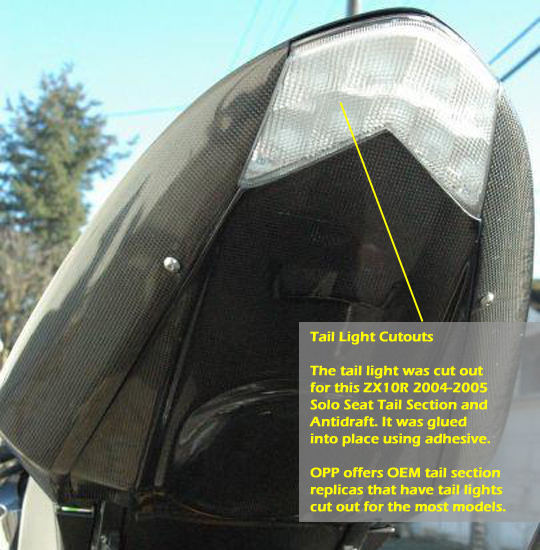
Tail Light Cutouts - Like front headlights, race bodywork does not have holes for OEM tail lights. (An exception to this is an OEM tail section. OPP offers replicas of stock tail sections with the tail light holes cut out.) The space where the tail light protrudes is covered up with more bodywork - the extra bodywork is often referred to as a small antidraft. There are two ways of adapting a race tail section for street use. The first method is to cut out the hole for the tail light using dremel and using adhesive to hold the tail light in place. Remember, the brackets that are found on stock bodywork are not normally found on race bodywork. The second, easier method is to purchase an external tail light such as a Mad Doctor Integrated Tail Light and installing it with the tail section. The advantage of a Mad Doctor integrated tail light is that it is functional and adds a unique look to the tail end of the bike.
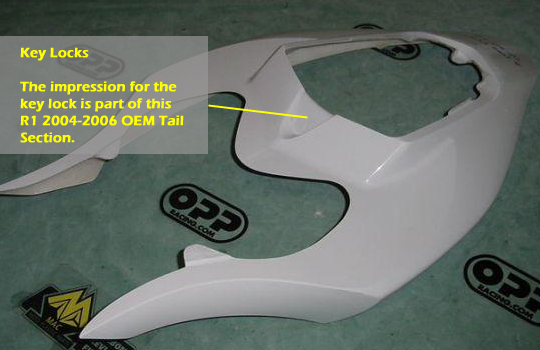
Key Locks - Holes for key holes are only relevant for OEM replica tail sections that have cut out on top for a passenger seat and trunk access. In some bodywork, you may find provisions for a key lock - in which case you may need to cut out the proper hole with a dremel and install the keylock with adhesive. There are exceptions though - for example, this R1 2004-2006 key lock slips over the cutout for the key lock - no adhesive required. But for most tail sections, it is unlikely that you will find brackets for mounting the key lock.
Impressions of Logos and Stickers - On some bodywork, you may find raised impressions of the original logos and stickers. This occurs when bodywork is made from original bodywork that still has the stickers attached. To remove such impressions, you can sand the outer epoxy resin down so it is flush with the rest of the bodywork and then polish the surface of the fairing. Why is the bodywork like that and why can't the bodywork be made without the stickers and logos? The reason is because most bodywork is made from fairings lent to the bodywork manufacturer. For example, MacMoto and Pro-Carbon are lent original bodywork from private individuals or private and factory-backed race teams. Removing the logos would require stripping the bodywork, removing the stickers, making the bodywork, re-attaching the stickers and refinishing the bodywork. This process is extremely expensive, time-consuming and inconvenient for the original owners.
Race Replica Specific Modifications
OPP carries a large number of race-replica designs - bodywork designs used by actual professional racers. A few examples are:
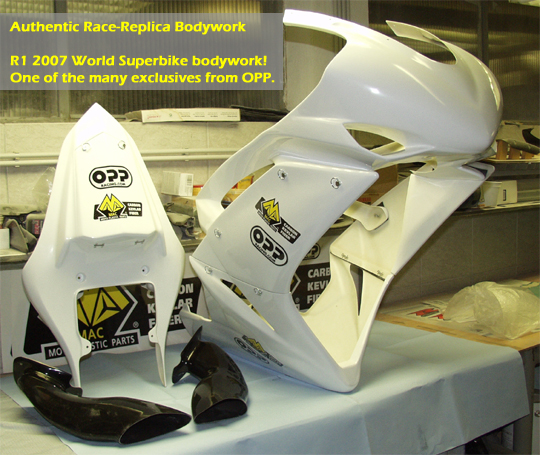
It's one thing to have a replica paint job - having replica bodywork is a whole new level of authenticity. However, it's important to remember that the bike underneath that bodywork is slightly different from a production sportbike. Fitting race-replica bodywork may require the construction of brackets and supports or drilling/tapping the frame, subframe or swingarm to fit the bodywork. Be sure to read the OPP descriptions for each set of bodywork to find out if it applies to your bodywork.
Tools for Installing Bodywork
Another list! Keeping in mind the points listed above, here are some specific tools that you should have before installing bodywork:
- Bike stands
- A drill with a uni-bit
- A dremel
- 3M Spray Glue (for seat foam)
- Heat resistant adhesive or automotive urethane
- Dzus fasteners (used to attach bodywork together)
- Friends to hold and steady the bodywork
Frequently Asked Questions (FAQ)
We get a lot of questions about installing, modifying and painting our fairings so let's use this opportunity to answer some frequently asked questions:
Why should I purchase aftermarket bodywork? Why from OPP?
There are a number of reasons why aftermarket bodywork is superior to OEM body panels. The first reason is cost: aftermarket bodywork is generally cheaper than ABS plastic fairings. The second reason is availability: with popular new models, replacement panels may not be readily available. The third reason is simplicity: aftermarket bodywork may combine panels to form larger pieces. These panels are easier to handle and require less hardware to install. The fourth reason is looks: OEM manufacturers only make smaller items out of exotic materials like carbon fiber.
Why OPP? There are a number of reasons why OPP is better than everyone else. The first reason is raw material: We don't use polyester resin in our bodywork. Our bodywork will not warp or shrink, is lighter and is more durable than polyester-based bodywork. Learn more about epoxy carbon fiber in our article entitled "Carbon Fiber 101: What You Need to Know about Epoxy Resin". The second reason is design: we manufacture our bodywork from original bodywork. We have the skill, equipment and facilities to do this. Ever notice how other companies take longer to manufacture bodywork? That's because they're waiting for companies like us to copy our bodywork. They don't know how to combine the OEM panels into larger fairings. OPP also carries unique designs that are duplicates or improvements on actual professional race bodywork. The third reason is variety: OPP has the largest catalog of bodywork for sportbikes, with uppers, lower, tail sections, fenders and gas tanks for bikes as old as 1991. We manufacture our bodywork in fiberglass and carbon fiber as well as exotic carbon kevlar and titanium silver. The fourth reason is detail: OPP pioneered the concept of carbon kevlar reinforcement for mounting points because we recognized that both stock and aftermarket bodywork lacked strength at critical areas. Our bodywork also features contoured bodywork that wrap around the bike - this eliminates sharp edges that may injure the rider in the event of a crash.
What is your bodywork made out of?
OPP bodywork is made out of fiberglass, Carbon Fiber, Carbon Kevlar and Titanium Silver. To learn more about each material and see pictures of each material, visit our Product Info Page.
Will it fit to my stock bodywork?
Most OPP bodywork is designed to replace your stock fairings: you must remove your fairings and replace them with the corresponding OPP fairings. For front fairings, most of the time you will need to purchase the OPP upper and lower and replace the stock panels on your bike. There are exceptions such as the ZX6R 2005-2006, ZX10R 2004-2005, ZX10R 2006-2007 and CBR1000RR 2004-2005 where the OPP upper or lower can fit to stock uppers, sides or lowers. Otherwise, make sure you order the upper and lower together. For tail sections, we offer 3 seat configurations to accommodate most rider needs (ie. Solo Seat Race/Superbike, Solo Seat or OEM Tail Replica). Undertails and antidrafts may need to be purchased with the matching tail section to fit properly. And as mentioned above, some modifications may be necessary to install on the bike, even if it isn't fitting to the original OEM panels.
Can I fit OPP fairings to another bike model?
OPP bodywork is designed to fit to the bike for which it was made. You may find that some bodywork will retrofit to another bike model without modification. Unfortunately, there are too many combinations for us to know about so unfortunately if you attempt to install bodywork on a different bike model, we can't help you. Modifications and brackets may need to be created to install it properly. Maybe the bodywork will not fit at all. Such projects should be attempted only when you have throughly researched the bike model and the bodywork.
Can you cut OPP bodywork?
Yes. Cutting through OPP bodywork can be done with a dremel. Cutting through our fiberglass, carbon fiber, carbon kevlar or titanium silver is like cutting through aluminum. You do not have to worry about spider-cracking or fabric fraying. The structural integrity of the part is not compromised. Parts made with epoxy resin (ie. carbon fiber, carbon kevlar or titanium silver) are exceptionally strong so if you miscut or misdrill, even the slimmest pieces of carbon will be stronger than the ABS plastic.
Can you paint OPP bodywork?
Yes. OPP bodywork can be painted. Our fiberglass is designed to be sanded and painted. You can apply primer before painting but it is not necessary. Our carbon fiber, carbon kevlar and titanium silver can also be painted. Standard preparation and painting techniques can be used on OPP bodywork. Consult your painter if you have any questions.
Can you repair OPP bodywork?
It depends on the severity of the damage. For fiberglass bodywork, if you drop your bike or crash it, you can repair and repaint it using conventional techniques. For exotic materials such as carbon fiber, carbon kevlar or titanium silver, it depends on whether it was painted or naked. If you are planning on repainting a repaired piece, it is no problem. Extra carbon fiber and carbon kevlar can be applied, the surface can be re-resined, sanded and repainted. If the material was exposed (ie. not painted), it can be more tricky. Scuffs to the outer surface can be polished. Sometimes extra resin may need to be applied before being refinished but this is a minor repair. For tears in the fabric, the weave will need to be carefully realigned before resining and refinishing. The piece can be sanded and polished to restore the outer finish but the part may bear a "scar" where the fabric fibers are out of alignment. For large holes, you may be better off replacing the piece rather than trying to rebuild the part. OPP does not offer repair services except in extreme circumstances so if you need to repair your fairings, please consult a local bodywork specialist.
When will XXX part be available for my bike?
OPP develops bodywork in stages because we have so many bike models to support! We usually start off with core bodywork for racers then revisit the bike for smaller accessories or for special parts. For example, the first group of bodywork to be manufactured is usually:
- Race Uppers (no headlight cutout)
- Lowers
- Superbike Tail Sections and Antidrafts (Uses seat foam, no passenger seat or tail light cutout)
- Solo Seat Tail Sections and Antidrafts (Uses stock seat, no passenger seat or tail light cutout)
- Front Fenders
- Superbike Airducts
The second group of bodywork to be produced may be:
- Uppers with OEM Headlight Cutout
- OEM Tail Sections (Uses stock seat, accepts passenger seat, has trunk access and tail light cutouts)
- Gas Tanks or Airbox Covers
- Rear Huggers
- Case Covers
- Frame Protectors
- Swingarm Protectors
- Chainguards
Unfortunately, we can't predict when parts will be made. There are many factors that determine which parts are made first such as obligations to the people who are lending us the bodywork, mould design and construction and the demand for parts. When you see pictures and prices posted on our website, it is safe to say that the bodywork is in full production. And when in doubt, contact us!
What are Dzus Fasteners?
Dzus fasteners are special purpose quick release fasteners used to attach bodywork together. They are different from stock fasteners that may attach to tabs or grommets found on most production bikes. Dzus fasteners are used professional racers in the AMA and World Superbike. Dzus fasteners are easier and faster to use than the original stock fasteners. They have added authenticity for those looking to make a race-replica sportbike. OPP recommends that you purchase Dzus fasteners when you purchase an upper and lower or tail section and antidraft.
What is a Thermal Protection Kit?
A Thermal Protection Kit is an OPP exclusive product designed to protect your fairings from the extreme heat produced by your exhaust system. On a fiberglass lower, the heat can ruin paint jobs by causing the paint to bubble. On a carbon fiber lower, the heat can cause thumbnail-sized blotches to appear on the lower. To prevent this, our Thermal Protection Kit contains exhaust shielding that is used to wrap and seal the exhaust headers. A reflect material called Reflect-A-Cool is applied to the lower to reflect heat away from the fairing. The Thermal Protection Kit is highly effective and is worth the investment if you are planning on purchasing aftermarket panels. You can also use our thermal products for additional heat shielding such as wrapping the exhaust headers for undertail exhausts. You should only be roasting nuts when you're at a campground, not when you are showing off your pimp ride.
Final Thoughts about Installing Bodywork
The best way to relate to bodywork installation is through an old joke:
One day, my motorcycle was making funny noises. I took the bike to an old mechanic who inspected it...looking and listening very carefully. He suddenly pulled out a hammer and gave the engine a quick tap. Voila! The funny noises stop. The mechanic said "That'll be $100." I was outraged, demanding to know why it cost so much when all he did was hit it with a hammer. The mechanic replies: "Hitting it with a hammer: $5. Knowing where to hit: $95."
Installing bodywork is easy...if you know what you're doing. Removing and installing stock fairings is one thing, mounting aftermarket bodywork is a different animal. This statement is not here to discourage you from purchasing aftermarket bodywork, not at all. However, it serves as a reminder that:
IF YOU DON'T KNOW WHAT YOU ARE DOING, TAKE IT TO A PROFESSIONAL!!!
A professional bodywork specialist or mechanic will have the knowledge, experience, tools and space to install your bodywork quickly and properly. The information in this article is very general - when you start working on specific bike models, there will be more installation issues to consider and work around.
Remember, if you have any questions, CALL US before purchasing any of products. We are more than happy to answer all of your questions!
Return to the Articles main page.
|